By Danny Paul van Iersel, 04-06-2024
Starting Custom Policies:
In our first part you have read about the Sitecore configuration on how to setup B2C authentication within Sitecore: Sitecore authentication with Azure B2C Custom policies Part 1
Now we will continue on how to configure your B2C custom policies.
The easiest way to get started is to use the provided flows from the B2C like “Sign up and sign in” flow. You can quickly test and see if your connection works.
But if we truly want to accomplish more with our flows we can setup Custom Policies. On the Microsoft learning platform you will find a tutorial how you can get started with custom policies
Within our B2C tenant go to Identity Experience Framework.
![]()
Go to Policy Keys:
![]()
Policy keys:
- Create Signing Key
- Create Encryption Key
App registration:
- Register IdentityExperienceFramework application
- Register ProxyIdentityExperienceFramework application
Start editing your policy:
- You can get a copy of the Starter Pack from:
git clone https://github.com/Azure-Samples/active-directory-b2c-custom-policy-starterpack- This will contain a few folders depending on your needs you can choose from what type you start.
- Modify all files:
- “yourtenant” into the name of your actual B2C tenant
- Modify TrustFrameworkExtensions.xml
- Locate the Technical Profile with ID “login-NonInteractive”
- Change both Metadata and both Inputclaims
- ProxyIdentityExperienceFrameworkAppId: into the Application (client) ID of “ProxyIdentityExperienceFramework application”
- IdentityExperienceFrameworkAppId: into the Application (client) ID of “IdentityExperienceFramework application”
Uploading your files
In your B2C Tenant go to the Identity Experience Framework:
![]()
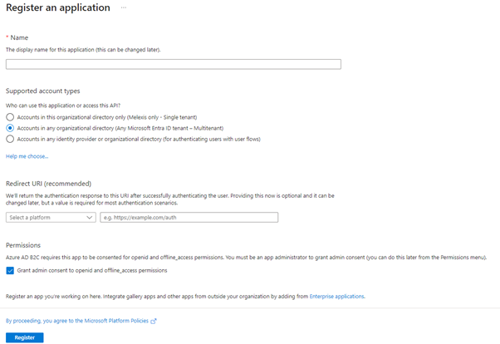
Register your application.
Add a new registration:
- Fill in the name of your application
- Choose what accounts are supported
- Redirect URI:
- This is the URL to redirect to our application once a user has signed in
- Example https://Your.Domain/signin-oidc
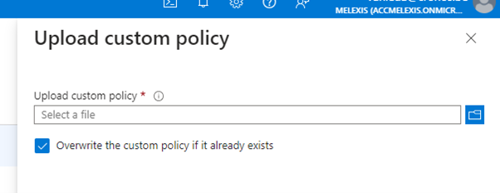
From the “Custom policies” you can upload your custom policies that we will create further on.
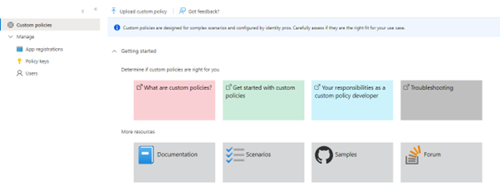
Custom policies that are created are shown below

When modifying a custom policy that already exist make sure you check the check box “Overwrite the custom policy if it already exists”.
Setting “forgot password flow”
By following the guide at https://learn.microsoft.com/en-us/azure/active-directory-b2c/add-password-reset-policy?pivots=b2c-custom-policy
You will be able to modify the behaviour for the forgot your password flow. By the default flow this will cause a redirect back to your application from where you can start the password reset flow. With custom policies you can enable the flow to stay within the B2C flow and continue without redirecting back to your application.
Modify the following files to accomplish this.
TrusFrameworkBase.xml:
- Make sure the version of the “Page Layout Version” is set to 2.1.2 or higher.
- Set supported Page Layout on signuporsignin
- <DataUri>urn:com:microsoft:aad:b2c:elements:contract:unifiedssp:2.1.18</DataUri>
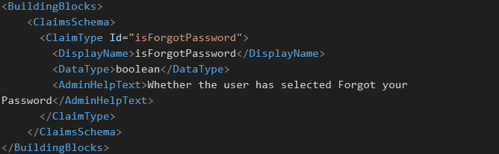
TrustFrameworkExtensions.xml:
- Create ClaimsSchema (if not already existing)
- Create ClaimType with id “isForgotPassword”
- Create Technical Profile with a Protocol: Name="Proprietary" Handler="Web.TPEngine.Providers.ClaimsTransformationProtocolProvider, Web.TPEngine, Version=1.0.0.0, Culture=neutral, PublicKeyToken=nul
- Set the OutputClaim

- Add SubJourney
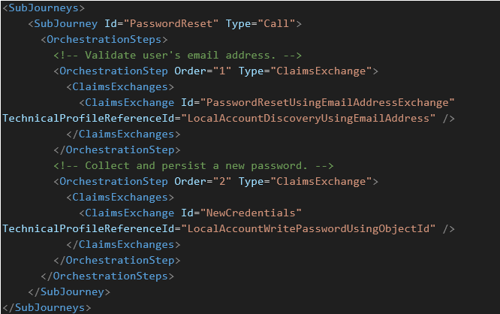
- Copy the UserJourney: Id="SignUpOrSignIn", from xml
- Modify the Id to “CustomSignUpSignIn”
- Modify the first OrchestrationStep:
- Add a ClaimsProviderSelection

-
-
- Go to the second OrchestrationStep and add a new ClaimsExchange
-

-
-
- Create a new OrchestrationStep of type InvokeSubJourney
- Reorder the remaining OrchestrationSteps so that the Order number is sequentially.
-
SignUpOrSignin.xml:
- Configure Default User Journey
- <DefaultUserJourney ReferenceId="CustomSignUpSignIn" />
Add output claim:

Setting Display name
With the Sign up flow you sometimes don’t want users to enter their own DisplayName.
If the DisplayName is not provided with the sign up form this will give the behaviour in the User list of your B2C an awkward look. For by default the column Display name is shown and it will show “unknown” for every user. Which makes it a bit difficult to read.
In order to do this we need the following changes to our TrustFrameWorkBase.xml
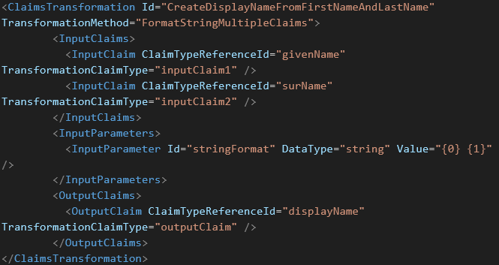
- Create Claims transformation
- Create Technical Profile
- Protocol ClaimsTransformationProtocolProvider
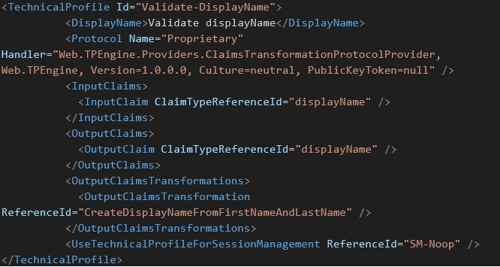
- Set Validation Technical Profile

Input ClaimsTransformation with lookup as output ClaimsTransformation
Scenario:
To check if a provided email should be allowed to create a user.
- Create 2 ClaimTypes:
- domain
- domainStatus
- Create 2 ClaimsTransformations:
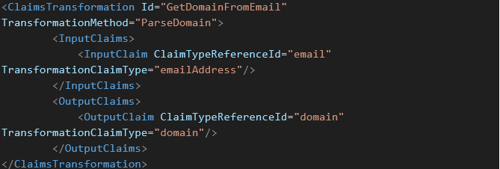
- GetDomainFromEmail
-
- LookupDomain
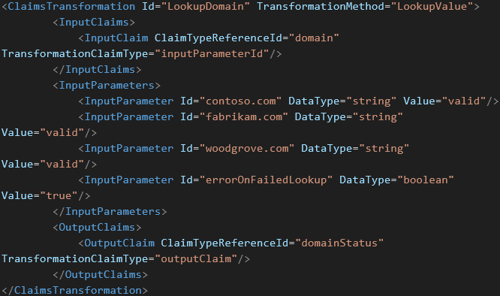
- Create TechnicalProfile
- Use the protocol “TPEngine.Providers.ClaimsTransformationProtocolProvider”
- Set the InputClaimsTransformations to execute the GetDomainFromEmail
- This will collect the email address and extract the domain
- Set OutputClaim to use the extracted domain
- For the OutputClaimsTransformation we use the LookupDomain ClaimsTransformation
- This will lookup the domain in the list and see if it is valid. If the domain is not in the list it will return the errorOnFailedLookup
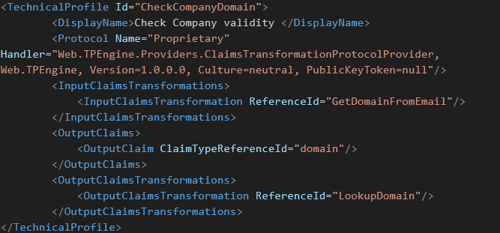
- Add ValidationTechnicalProfile to the Technical Profile that uses the Protocol SelfAssertedAttributeProvider where we want to include this validation
- Add A new ValidationTechnicalProfile (if the ValidationTechnicalProfiles tag is not existing add this first.)

- Save and Upload your changes to B2C - Identity Experience Framework as Custom policies.
Call a Rest API in B2C Custom Policies
If you have complex application logic that needs to be implemented you have the possibility to call a Rest API from within the B2C Policy
Assuming we already have an API to call that returns a HTTP 200 OK response if the validation is approved.
If the check is not approved then it should return a HTTP 409 Conflict as response.
To setup the this requirement we need:
- A new TechnicalProfile
- This uses the Protocol “Web.TPEngine.Providers.RestfulProvider”
- Use the Metadata fields
- ServiceUrl à the URL of your API call
- SendClaimsIn à where to place the claim values
- Body (will force the call to be used as POST)
- Form (will force the call to be used as POST)
- Header (will force the call to be used as GET)
- URL (will force the call to be used as GET)
- QueryString (will force the call to be used as GET)
- Sets InputClaims to be send to the API
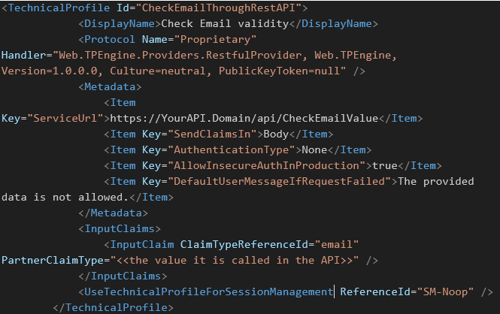
You can check all the Metadata, error handling, cryptographic keys, input and output parameters on: https://learn.microsoft.com/en-us/azure/active-directory-b2c/restful-technical-profile
To use our TechnicalProfile we need to add it to the ValidationTechnicalProfile.

In our code of the API if it is approved we send an OK message:

If it is not okay we send out the following message:

Conclusion
Using custom policies with Azure B2C can provide you with a massive variety of possibilities that can make your implementation work extremely well for you.
You can cover almost every aspect of the wishes from your customers and provide them with a solution that fits their needs.
At Blastic we are always happy to help you and you are always free to contact us if you need any assistance.
Contact ons
Ready to take your digital experience to the next level? Feel free to contact us to learn more about our services and how we can help you leverage the full potential of your digital marketing.
Tell us about your project
And we'll come up with a tailor-made solution
Get in touch with one of our consultants to find the perfect match that fits your needs and enables you to grow.