By Danny Paul Van Iersel, 19-05-2025
There are many ways to interact with your customers. Even if you don't personally interact with your customers, your website can do much more than just show information.
By personalising your customer experience, you can ensure that your customers get the information that is relevant to them - ideally information that they haven't seen before which in return will increase the chances of them returning to your website.
Planning is your first step
Like many aspects of managing your website, a personalised customer experience starts with... a well-thought-out planning. Just like we previously explained how you should set-up your website bases on content modelling, a good initial analysis and planning will lead to great benefits.
In case you have missed our blogpost about content modelling, you can still read about it here.
First of all: How do you want to track your visitor's behaviour?
Tracking your visitor behaviour can be done on many levels within Kentico.
You can either:
- Rely on Kentico's built-in activities
- Track their behaviour in the captured contact's data
Get in Touch
Ready to take your digital experience to the next level? Feel free to contact us to learn more about our services and how we can help you leverage the full potential of your digital marketing.
Activities within Kentico
Currently Experience by Kentico provides the following activities: (source from Kentico Documentation: https://docs.kentico.com/developers-and-admins/digital-marketing-setup/set-up-activities)
Activity type |
Code name |
Description |
|---|---|---|
|
Click |
click |
|
|
Data input |
datainput |
|
|
Email click |
emailclick |
Logging requirements
|
|
Form submission |
bizformsubmit |
|
|
Landing page |
landingpage |
Logging requirements
|
|
Member registration |
memberregistration |
|
|
Page visit |
pagevisit |
Logging requirements
|
Next to these built-in activities, you can always create your own activities to better suits your requirement.
Captured content data
Aside from activity-based events, you can also rely on Kentico's contact-data to track your visitor.
Contact in Kentico can be enriched with data that you collect from your visitor on several ways. You can track their journey throughout your website, by checking the pages that they viewed. Or by just simply asking them by filling in forms to leave their email address or you could use a form to ask questions on what they are looking for.
Contact forms can provide a lot of data for your future personalisation, if you create a contact form that includes topics about your products you know what questions the visitor has for your products.
Great, can we personalise our Kentico website now?
Almost there! Before you can use the personalisation functionality, there are some requirements and configurations first.
- Setup user tracking
- Using "Contacts" to store your user data and are available across your channels.
- GDPR
- It is required by law in European countries to ask permission to start with user information tracking.
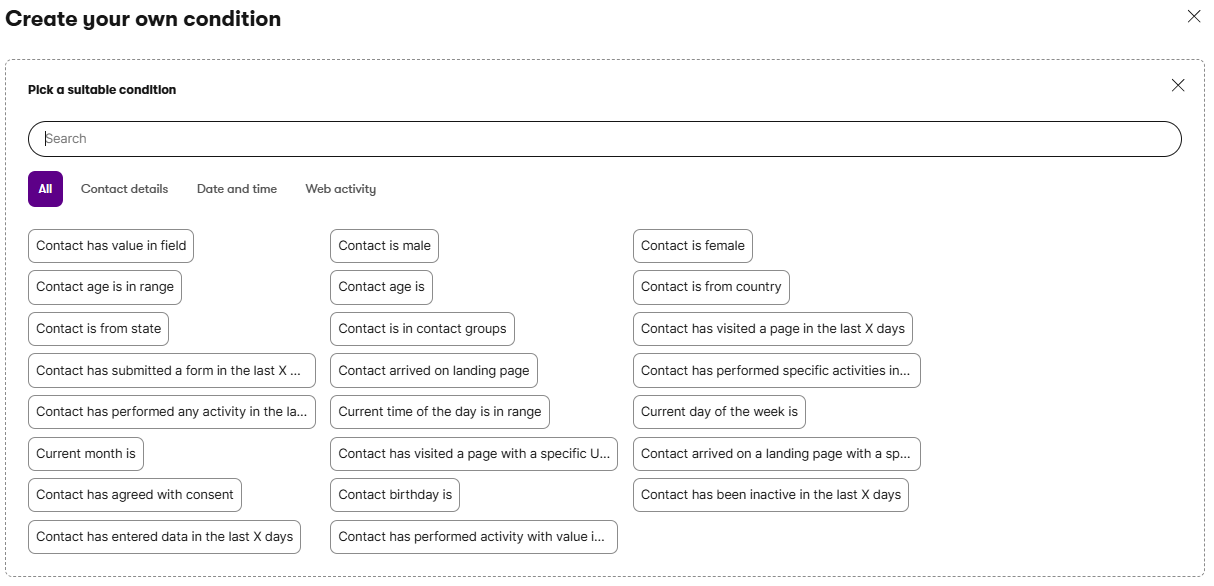
Now you can start creating personalisation conditions
Once you have figured out which data you will use to personalise and setup the necessary pre-requirements, you can start developing your own Personalisation rules.
First we need to create our own "RegisterPersonalizationConditionType" classes. These will provide a personalisation condition in Kentico.
We'll start by creating a Contact Group selection. A perfect example on how to implement this would be from the Community Portal: https://github.com/Kentico/community-portal/blob/main/src/Kentico.Community.Portal.Web/Components/Personalization/IsInContactGroupConditionType.cs
The example above defines a customer condition that will check if our current contact is a member of a specific contact group. Once deployed, an editor can choose this condition type and make a selection of Contact Groups that the visitor needs to be in.
With this setup you can create new contact groups in Kentico and personalise your content based on the contact group-membership of your visitor.
Of course, the sky is the limit when it comes to personalisation conditions. By extending the example above, you can implement any personalisation condition that you can think of - or at least those that you thought of during your analyse-phase.
Another example would be, if you have your visitors login to access a restricted section of your website. Possible conditions could be:
- Check if the contact is logged in (is the current visitor authorised?)
- Check logged in user specific properties:
- Does the user have, purchased products that not yet have been paid?
- Example usage: Show remeinder to the visitor to pay first to receive the products.
- Does the user have, orders that are not yet delivered?
- Example usage: Show active status of ongoing purchases.
- Does my user have, recent orders that have been delivered in the last 2 weeks?
- Example usage: Request feedback on the products or services.
- Does the user have, purchased products that not yet have been paid?
From your analyse steps you will know what conditions you would need to provide the correct content to your visitors. All these personalisation conditions can be created and used for editors.
Configure your widgets to use your conditions
By going to the page builder and edit the page, you have the option to set your personalisation on the widget.
If no personalisation has been configured yet, you will see a single figure to set your personalisation:
![]()
If a widget already has some personalised settings, you will see multiple figures in this dialog:
![]()
To set your personalised variant click on the available Condition option:

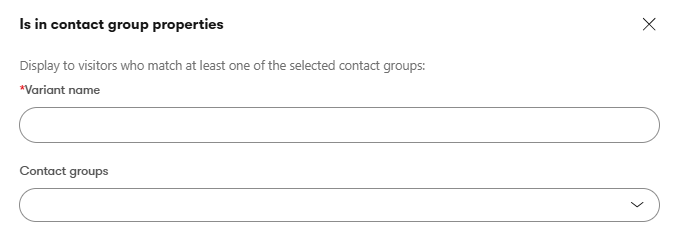
In the case for "Is in contact group" a side panel will pop out, giving you the option to set a name and link the contact group:
If a personalisation is already set you will have the option to change or remove it. You can also add more variants of the same condition.

By clicking on the variant, the editor will show you what is shown for that personalisation-variant. you can then modify the content for the selected variant, effectively enabling you to define specific content for that target-group.
Once you have saved and published your page the widget will behave as configured with the personalisation.
Conclusion
The options for personalisation are a powerful asset to the marketeers. They have the option to guide users with specific conditions and to have more control an how a user interacts with your channel.
By understanding your visitors' behaviour, you can guide them to more relevant content and enable your marketers to better reach and connect with them.
Tell us about your project
And we'll come up with a tailor-made solution
Are you interested in knowing how we at Blastic can help you out to optimise your user experience? Please feel free to contact us.